Saturday, April 28, 2012

Olive Garden at Home and the BEST Tomato Soup EVER!

My husband loves tomato basil soup. I've made it from scratch many times and always try new recipes because I just haven't found one I completely love, or one that we BOTH completely love.  Well, the search ends here, tonight because this recipe is the best.  I found it on....wait for it.... pinterest!  The author of the blog also claims it to be the best so I couldn't resist.  The blog is Everyday Occasions and the soup is delicious. I suggest you just plan on making this whenever you're in a tomato soup kind of mood - forget the canned stuff!

The Best Tomato Basil Soup


Ingredients

3 cloves of garlic, minced (I used 4 cloves because I have a garlic addiction)
2 tablespoons of olive oil (I used coconut oil because it is my new experiment)
2 - 14 oz. cans of crushed tomatoes
1 - 14 oz. can of whole tomatoes  (I used a can of fire roasted diced tomatoes)
2 cups of stock (I used vegetable)
1 tsp of sea salt
1 tsp of sugar
1/2 tsp of fresh ground black pepper
1/4 cup of heavy cream (I used fat free half n half)
3 tablespoons of fresh basil, julienned
parmesan cheese (use fresh, it's just better)

Directions
In a saucepan, saute garlic in olive oil on medium heat for 1 minute - being careful not to burn the garlic.  Add the crushed tomatoes.  Add the whole tomatoes one at a time, squeezing them into the pan to break them up.  Add the juice from the whole tomatoes, as well.  Add stock, salt, pepper and sugar.  Cook the soup on medium at a simmer for 10 minutes. **At this point I ran an inversion blender through the soup because I like it smooth and not chunky.**  Then reduce the heat to low and stir in heavy cream and basil.  Serve topped with Parmesan cheese.

And a salad...

Copy Cat Olive Garden Salad
We had this soup with an Olive Garden-esque salad.  I found a copy cat recipe for the dressing years ago so I can't give credit, but I've seen similar recipes on pinterest.  

The dressing:
1/2 cup mayo (real stuff, none of that Miracle Whip business)
1/3 cup vinegar
1 tsp. vegetable oil
2 Tbsp. corn syrup
2 Tbsp. Parmesan, shredded
2 Tbsp. Romano (I've used more Parm or Mozzarella when in a bind)
1/4 tsp. garlic salt
1/2 tsp. Italian seasoning
1/2 tsp. parsley
1 Tbsp. lemon juice

Process in a food processor, blender or with an inversion blender. Enjoy!

The salad:
Chopped romaine
Mild banana peppers
Sliced red onion
Black olives
Tomato
Croutons
Shredded Parmesan

The soup is only 84 calories for a 1 cup serving! Out of laziness, I just entered "Olive Garden Signature Salad" into My Fitness Pal and it said one plate was 200 calories.  I think a cup of this rich, hearty soup with a plate of tangy, flavorful for under 300 calories is a steal!  I had a piece of homemade beer bread and found it to be an exquisite meal! 

Tuesday, April 24, 2012

Gooey, Delicious Low Calorie Reese's Cupcakes?

So I found this recipe on pinterest and I have to say I was a little skeptical. Supposedly you can make a cake mix with only seltzer water and yogurt?  I don't bake that often because I don't really like to and also because nearly every baked good yields an ungodly amount of calories. My husband loves when baked goods appear, but we have been on a serious baked-goods-drought around here!  So I decided to try these from createlive.com:


Oh, did I mention they are only 96 calories each???  Really!

Check out the original recipe (and step-by-step photos) HERE.  I made a few changes (mostly just "light" versions of ingredients).  Here's my version (makes 24 cupcakes):

- 1 Devil's Food Cake dry cake mix
- 1/4 cup plain, fat-free Greek yogurt
- 3/4 can seltzer water (I use 1 1/3 cup because I could only find large bottles)
- 24 mini Reese's cups, frozen

- 1 8oz tub of light cool whip
- 3 Tbsp peanut butter
- 3 tsp brown sugar

1. Preheat the oven to 350 degrees. Then simply combine the cake mix with the seltzer water and yogurt. Distribute into muffin tins (lined with cups) and plop one Reese's in the center of each one. Don't push down too much, they will sink as they bake.  Then, follow the box directions to bake (about 18-24 minutes).

2. Frosting: mix cool whip and brown sugar, then add the peanut butter and beat until smooth.

3.  Let cupcakes cool completely then frost!

I put the frosting in a ziploc bag and "piped" the frosting.  My only complaint is that the frosting is a little runny, maybe because I used light cool whip?  A friend of mine who makes serious cupcakes, suggested unflavored gelatin to thicken it, but I don't have things like that on hand, so I'll have to try that next time.

These are absolutely delicious and do not taste low-fat, low-cal or anything "low" for that matter! They just taste delicious! And the best part? Only 96 calories per cupcake!

Here's the breakdown: 96 calories / 11 carbs / 5 g fat / 2 g protein


Sunday, April 22, 2012

Skillet Gnocchi with Chard & White Beans

I have been without a computer for a week so I've accumulated a couple recipes to share!  I'm excited to start with this one because it was very simply, very nutritious and very flavorful, considering it doesn't really contain many ingredients.  Also, it's from one of my favorite sites/magazines: Eatingwell.com.  I used swiss chard, but you could use spinach or even kale.  I had most of these ingredients on hand (well,  not the gnocchi) and the whole thing was ready in 20 minutes (maybe even less!).  In addition, I was really surprised how flavorful the dish was.  In the future I might add mushrooms (because I add mushrooms to anything), but I honestly didn't think it needed any changes! And that's a big deal coming from me!


Skillet Gnocchi with Chard & White Beans

Skillet Gnocchi with Chard & White Beans Recipe

Ingredients:
  • 1 tablespoon plus 1 teaspoon extra-virgin olive oil, divided
  • 1 16-ounce package shelf-stable gnocchi
  • 1 medium yellow onion, thinly sliced
  • 4 cloves garlic, minced
  • 1/2 cup water
  • 6 cups chopped chard leaves, (about 1 small bunch) or spinach
  • 1 15-ounce can diced tomatoes with Italian seasonings
  • 1 15-ounce can white beans, rinsed
  • 1/4 teaspoon freshly ground pepper
  • 1/2 cup shredded part-skim mozzarella cheese
  • 1/4 cup finely shredded Parmesan cheese

  • Directions:
    1. Heat 1 tablespoon oil in a large nonstick skillet over medium heat. Add gnocchi and cook, stirring often, until plumped and starting to brown, 5 to 7 minutes. Transfer to a bowl.
    2. Add the remaining 1 teaspoon oil and onion to the pan and cook, stirring, over medium heat, for 2 minutes. Stir in garlic and water. Cover and cook until the onion is soft, 4 to 6 minutes. Add chard (or spinach) and cook, stirring, until starting to wilt, 1 to 2 minutes. Stir in tomatoes, beans and pepper and bring to a simmer. Stir in the gnocchi and sprinkle with mozzarella and Parmesan. Cover and cook until the cheese is melted and the sauce is bubbling, about 3 minutes.

Nutrition information p
er 1 cup serving:
 325 calories; 7 g fat / 55 g carbohydrates /14 g protein / 6 g fiber
 

    Saturday, April 14, 2012

    A Low-Cal Take on Taco Bell

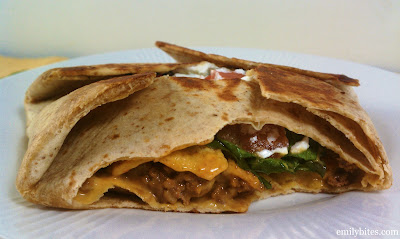
    My husband is happiest when we have tacos for dinner. I like to think I make some mean Mexican dishes, and he does enjoy them, but it's basic tacos that are his favorite. I love tacos too, but sometimes a girl wants to mix it up a bit.  I was looking for something that would satisfy the hubby's taco craving (it has been over a week since we last had them, after all) and my need for something quick and different.

    I was recently introduced to the site Emily Bites.com.  It's pretty comparable to Skinny Taste.com and I like sites that include all the nutritional information for me.  I was scrolling through the new site and came upon what this blogger calls Taco Wrap Deluxe. This recipe was inspired by Taco Bell's Crunchwrap Supreme which is 540 calories.  The version that follows is half that: 247 calories. This means you can eat two! I suppose a person could eat just one and save some calories, but I'm generally about eating as much as I can! Actually, I did only eat one, but it allowed me the freedom to have some chips and salsa on the side.

    And I don't even have any changes/additions to add to this one. It was just plain good and easy as heck!

    Taco Wrap Deluxe


    Ingredients:
    - 1 lb raw 95% lean ground beef
    - 1 packet reduced sodium taco seasoning (*I never use these packets. I make my own mix)
    - 8 tortillas, I used La Tortilla Factory Smart & Delicious 100 Calorie Whole Wheat (the hubby used normal, flour tortillas)
    - 1 cup (16 tablespoons) of queso dip or salsa con queso, warmed (I used On the Border's Monterey Jack Queso)
    - 24 Tortilla chips
    - Shredded lettuce
    - 1 medium tomato
    - ½ cup (8 tablespoons) light sour cream (you could use Greek yogurt, blech)

    Directions: 
    The website with this original recipes has a couple great step-by-step assembly pictures if you're more of a visual learner. Check it out HERE.

    1.    Bring a large skillet over medium heat and cook the ground beef, breaking it up with a spoon until browned. Add the taco seasoning and stir until combined. Continue to cook for another couple minutes to coat the beef in seasoning. 


    2.    Place a tortilla on a microwave-safe plate and spoon 2 tablespoons of queso dip in the center. Smooth the queso out in a circle, covering only the center of the tortilla (leaving 1-2 inches dry around the edges. Microwave the tortilla for 15-30 seconds to make it more pliable. Remove the tortilla from the microwave and add around ¼ cup of the seasoned beef and spread over the top of the queso. Break apart 3 tortilla chips and place those in a layer over the beef. On top of the chips, layer the lettuce, tomatoes and yogurt in whatever order you choose. I did yogurt last but I think it should probably be first after the chips, with the lettuce and tomatoes on top of it. Fold the edges of the tortilla up around the filling. There will most likely be a small gap in the center – that’s okay!

    3.    Lightly mist a skillet with cooking spray and bring over medium heat. Place the taco wrap folded side up on the skillet and mist the top of the wrap with cooking spray as well. You can hold the folded flaps of tortilla down while it cooks if you want, but after a minute I just placed a smaller skillet bottom side down directly on top of the taco wrap to free up my hands and that held it together just fine. When the bottom of your wrap is browned (this should only take a few minutes), flip the wrap over, making sure all the tortilla flaps stay tucked underneath (this was actually easier than it sounds) and continue to cook for a few additional minutes until that side is browned too.

    4.    Repeat with remaining ingredients (though if you have a large skillet or griddle pan you can likely cook more than one at once) and serve.
    Nutrition Information per serving: 247 calories, 32 g carbs, 9 g fat, 23 g protein, 14 g fiber


    The Review?
    These were so good and really easy! I was worried that they'd be hard to flip or the stuff would fall out, but that was not the case. Also, you could add refried beans or substitute the meat with refried beans. Chris would have loved the addition of freshly chopped jalapenos (but I just thought of it now). I figure, from beginning to end, this couldn't have taken any longer to prepare than getting in your car and driving to Taco Bell and it was certainly a lot healthier and a lot more flavorful!

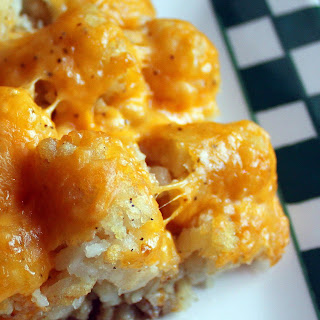
    Tator Tot Casserole

    *I wrote this post on Tuesday and forgot to upload it!

    I'm not sure where all of you live, but the Michigan weather has been moodier than usual this year.  We had a two whole weeks (in March) of temps in the 70's and 80's! We all knew it wouldn't last. We all said things like, "Watch it will snow in April," well here we are, that day we spoke of. Today we were lucky if it reached 40 degrees, but it was also so windy and the wind was bitingly cold.  In addition, my workplace was freezing. I wore long sleeves to accommodate for the cold weather, but I was cold all day.  Needless to say, around 2:30 I started dreaming of comfort food.

    I'm pretty sure that my husband once told me that he had never had tator tot casserole.  I know I've never made it.  It's sort of one of those indulgences like biscuits and gravy that I avoid at all costs, mostly because I can never just eat a little. I want a plate full and then I want seconds! And then I want to eat it for breakfast, lunch, and dinner the next day!

    I reviewed several recipes online and came up with the following (kind of a compilation of many). I also added a lot more veggies than I think it traditionally contains. Why? Well because that's how I roll!

    Tator Tot Casserole
    Image Detail
    (photo credit)

    1 - 10 oz can 98% fat free cream of mushroom soup
    1 cup 2% milk (skim would save you some calories!)
    1 small onion, chopped
    1 cup frozen green beans
    1/2 cup green pepper
    1/2 cup frozen corn
    1 cup mushrooms, chopped (I LOVE mushrooms so I used a lot - you could cut this in half)
    2 cloves garlic, chopped
    1 lb lean ground beef
    1/2 tsp dried basil
    1/2 tsp dried thyme
    1 tsp season salt (Lawry's, Old Bay, Adoba, any will do)
    salt and pepper, to taste
    1/2 cup low fat cheddar cheese, shredded and divided
    1 lb frozen tator tots (about 45 tots)

    1. Preheat oven to 350 degrees.

    2. Coat a 9x9 pan with cooking spray and set aside. Whisk together the cream of mushroom soup and milk and set aside.

    3. Coat a skillet with cooking spray and add the onion, garlic, green pepper, frozen green beans, and frozen corn.  Saute, stirring occasionally, until onions begin to soften (about 5 minutes) and vegetables begin to warm up. They may still be cold (remember they'll cook in the oven later).

    4. Stir in the ground beef and brown.  

    5. When beef is mostly browned, add the mushrooms and continue to brown meat.

    6. Add basil, thyme, and season salt - stir to coat. Also add salt and pepper, to taste.

    7.  Transfer meat mixture to the prepare casserole dish and top with 1/4 cup shredded cheese.

    8. Arrange tator tots on top.

    9. Bake 45-60 minutes - until the tots are nice and golden brown!

    10. In the last 2-3 minutes of baking, sprinkle the remaining 1/4 cup cheddar cheese over the top.

    Serving size? Well I divided my 9x9 casserole dish into 9 servings.  I found 1 1/2 servings to be enough to satisfy my comfort food craving ... then I went to zumba! 

    Serving Size: 1/9the of recipe: 442 calories / 16 carbs / 33g fat / 19 g protein

    The Review?
    I absolutely loved this and did eat little nibbles of it whenever I could over the next couple days. Other than the season salt and a a little pepper, I didn't add any more salt so it did need a little sprinkle at the table.  I definitely prefer the taste of frozen veggies to canned, but canned would work if that's what you have on hand.  I think this one is a keeper!


    Monday, April 2, 2012

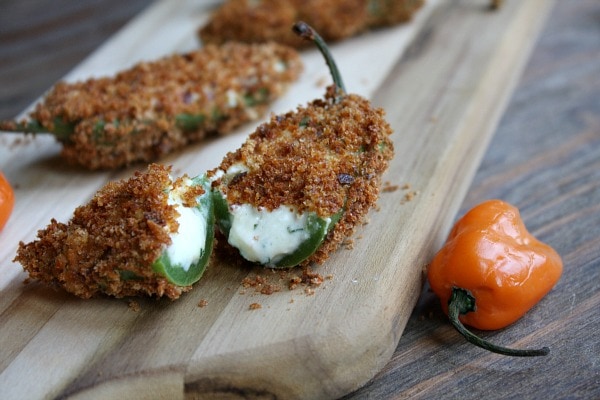
    Baked Jalapeno Poppers

    Generally around 8:00 at night, all things fatty and fried sound good to me. I think there is a connection, for me, between being bored and craving junk food. By 8:00 or 8:30 my son is in bed (well, let's be honest, sometimes it's not until 9 or 9:30), and the day is winding down. My husband usually busies himself with the internet or a home improvement task or his guitar and I sit around and read or watch TV, but mostly think about junk food. Usually I'm not hungry, but I think about it anyway! I did find, a while ago, that when I gave up refined sugar completely these cravings went away... but, unfortunately, living a life that is completely sugar-free is just a journey I'm ready to embark on!

    If I have calories left or the motivation, I generally first dream about I want to eat in a calorie-free world, then I wonder if I can make it myself.  Over the years, this process has led to homemade mozzarella sticks, sweet and sour chicken, pork dumplings, gooey nachos, and chicken wings, just to name a tiny few.  Well last night I wanted jalapeno poppers.  Since I'm on spring break, it is completely okay to undergo such a task at 8:00 at night!

    Now, if you don't care about calories or fat and want some real, fried, delicious poppers, THIS recipe is the best!  I have made it before and the husband and I devoured them.

    Last night I found THIS recipe from RecipeGirl.com which features baked poppers. The best part? Four poppers is only 110 calories!  My version of the recipe is below:

    Baked Jalapeno Poppers


    POPPERS:
    1/3 cup whipped cream cheese
    1/3 cup part-skim ricotta cheese
    1/2 cup (packed) grated Monterey Jack Cheese (2 ounces)
    1-2 tablespoons minced green onions
    1 Tbsp real bacon bits
    12 medium fresh jalapeño peppers, halved lengthwise, seeded and deveined
    1/4 cup all-purpose flour
    1/2 teaspoon salt, divided
    1/4 teaspoon freshly ground black pepper, divided
    1 large egg
    2 tablespoons water
    1 cup panko breadcrumbs
    2 teaspoons smoked paprika
    1 teaspoon garlic powder
    pinch cayenne pepper

    Directions:

    1. Spray a baking sheet with nonstick spray. In a small bowl, stir together the cheeses green onion, and bacon bits. Fill each jalapeño half with 2 teaspoons of the cheese mixture.
    2. On a plate, combine the flour, 1/4 teaspoon of the salt, and 1/8 teaspoon of the black pepper. In a small bowl, beat together the egg and the water to combine. On another plate combine the breadcrumbs with 1/4 teaspoon salt, 1/8 teaspoon black pepper, the paprika, garlic powder and cayenne pepper.
    3. Dip each jalapeño half in the flour, shaking off the excess, then in the egg wash, and finally in the bread crumb mixture, shaking off the excess.
    4. Place the coated jalapeños, cut-side-up, onto the prepared baking sheet and spray lightly to coat with cooking spray. Bake until golden brown and crisp and the cheese has melted, about 30 minutes.


    Nutritional Information per serving:
    Serving size: 4 poppers
    Calories per serving: 110
    Fat per serving: 9g
    Saturated Fat per serving: 3.5g
    Fiber per serving: 2g
    Protein per serving: 6g
    Cholesterol per serving: 45mg
    Carbohydrates per serving: 8g
    WW POINTS per serving:
    Points Plus Program: 4 Old Points Program: 3

    The review?
    First of all, don't be intimidated by the recipe. It's really easy. The worst part is deveining the peppers (if you have sensitive nasal passages like I do). Also, baking the peppers takes out some of the heat.  

    These are absolutely delicious.  I would check them around 20-25 minutes though. I set the timer to 30 minutes then went back to watching a DVR'd episode of Khloe and Lamar. When the timer went off, the cheese had oozed out and the peppers were a little limp. This did not affect the flavor at all. They were SO good.  We dipped them in a little sweet and sour sauce. The bacon bits was a good addition because the flavor really came out and it only added about 2 calories per pepper.  They are, of course, the best when fried, but this will definitely do in a fix! My husband said he would definitely eat them again.