Friday, June 22, 2012

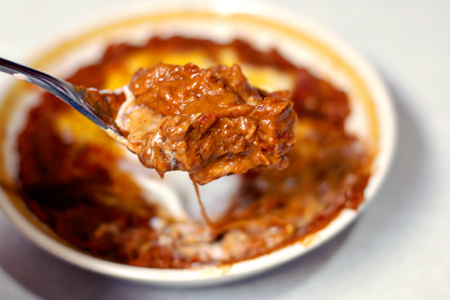
Crispy Ranch Chicken and Oven Chips

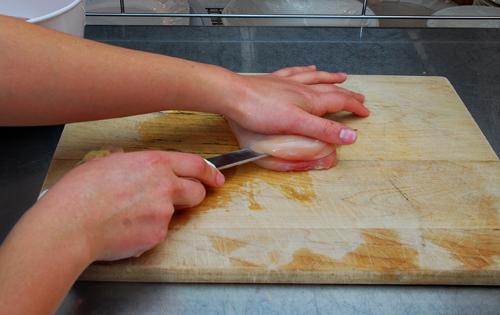
A friend of mine actually came up with this recipe and was kind enough to share it with me! She said her husband raved and, since I've been in a bit of a cooking slump, I was thrilled to have a new recommendation! I agree with her: easy and tasty! My occasionally-picky three-year-old ate everything on his plate and said, "This is so good, mama." I like to use chicken cutlets because they are thinner and cook faster and more evenly. They are also a lot less calories than a thick, meaty breast (haha). You can "make your own" chicken cutlets by simply cutting a thick chicken breast in half ... lengthwise? widthwise? I'm not sure how to describe it. You'd butterfly it, but cut all the way through? Like this (thank you google images!):

Okay, now that we've gotten that taken care of, another reason you'll like this recipe is because it's a great way to use up the last stragglers of potato chips that seemed to hang out in your pantry forever (at least they do at my house). They've been forgotten and shoved to the back of the pantry to make room for a new bag of fresh, crisp, whole potato chips.  You could sub breadcrumbs as well (plain, Italian, or panko would all work.

Crispy Ranch Chicken


Ingredients


  • 4 chicken breast cutlets
  • 3/4 cup ranch - I used my homemade ranch
  • 1 - 2 cups crushed potato chips, any kind (or breadcrumbs) - the thickness of your chicken will account for how much "breading" you'll need.


Directions
1. Create a dipping assembly line:
2. In a large skillet, heat a tablespoon of olive oil at medium heat. 

3. Dip each chicken breast in the ranch ( shake off excess) then in the potato crumbs (shake off excess).

4. Cook on medium heat for about 5-6 minutes on each side (again, depends on thickness). *Resist all urges to move these around or check underneath during the first 5 minutes. This will give the breading time to crisp up. I also recommend using a turner to flip rather than tongs, it will help preserve the crust!

Nutrition? There are many variables when calculating nutrition for this recipe: size of cutlet, brand of dressing, potato chips vs. breadcrumbs.  I used a 4 oz. chicken breast, my homemade ranch, and season kettle chips. This adds up 300 calories for one chicken breast.


Thick-Cut Oven Chips
These were a simple side item that would completely satisfy a french fry craving, but spare you the guilt! My recipe served two and a half of us (the toddler counting as the "half").
Ingredients 
  • 3 medium-sized Russet potatoes (about 5 oz each)
  • Season salt (I used Lawry's)
  • Non-fat Cooking Spray (you could use olive oil, but that means more calories)


Directions
1. Preheat oven to 500 degrees (yikes, right?)

2. Wash and scrub potatoes then slice into 1/8-inch rounds (see picture above). I use a mandolin to do this, but you can use a sharp knife. Don't worry about the thickness, but do try and keep them close to the same so that they cook evenly.

3. Liberally spray your cookie sheet with cooking spray, or better yet, cover it with foil and then spray it liberally with cooking spray!

4. Lay the potato slices out in one layer.

5. Spray slices with cooking spray then sprinkle with seasoned salt (we're going to do this to the other side later so don't go crazy with the salt!)

6. Bake for 25 minutes. Midway through, pull potatoes out, flip and coat with cooking spray and a sprinkling of season salt again.

Nutrition? A 5 oz baked potato is 130 calories. If you use cooking spray, you're adding zero calories and the same is true of season salt! However, if you're watching your sodium intake, go lightly on the Lawry's and see the variations below.

Variations:
You could completely omit the salt altogether by using Italian seasoning, or fresh rosemary and garlic powder, or even chipotle seasoning. Pretty much any savor spice would be great!

Thursday, June 21, 2012

Father's Day Oven-Baked Ribs

We just celebrated Father's Day this past Tuesday. I had planned to do something with shrimp and then, a day or two before, my husband says, "You should make ribs. We never make ribs." He's right. I attempted ribs once when we were first living together and it must not have been a glorious moment because I've never made them again, nor have I had any interest in making them since!  Partly, I don't particularly care for ribs. I remember going through a phase in middle school when I liked them, but they seem to me to be a lot of work for little nibbles of meat.  Well I'm about to offer you a recipe that might just change your mind. It certainly changed mine! Partly, it was the BBQ sauce, though; the BBQ sauce recipe that follows is absolutely to die for (and I don't use that cliche lightly). It's a sauce that leans a bit more to the teriyaki side of things, but since eating these ribs, I've dreamed of other uses for that heavenly sauce! Also, this recipe is so, so easy. Your guests will think you're Bobby Flay, and will never know how little effort you actually put forth!

Oven Baked BBQ Ribs
Sorry for the glare, took this picture in a hurry! The men were drooling!

Ingredients

Ribs
3-4 lbs baby back pork ribs
1/2 cup dry rub (below)
Most Delicious BBQ Sauce (below)

Dry Rub (combine the following):
1/4 cup brown sugar
1 Tbsp of each: paprika, chili powder, garlic powder
1 tsp of each: salt, pepper, cumin


Most Delicious BBQ Sauce (from TheComfortofCooking.com)
Wisk all ingredients together and set aside:
1/2 cup brown sugar
1 tsp. dry mustard
1/4 cup ketchup
1/4 cup soy sauce
1/4 cup Worcestershire sauce
1/4 cup onion, minced
2 cloves garlic, minced
1 tbsp. salt
1 tbsp. freshly ground pepper

Directions:
1. Pat ribs dry and slather with a 1/2 cup of the dry rub. Give those ribs a good rub down. You want the brown sugar to dissolve a bit.

2. Wrap the ribs in foil (be sure it's sealed up because you will have juices). Place on a cookie sheet with a lip (also called a jelly roll pan in some circles) and pop in a 300 degree oven for 2-1/2 - 3 hours. That's it!  I placed my ribs meat side down so that they could simmer in their own juices... That'll teach em!

3. Around the 2-1/2 hour mark, check the ribs for tenderness. You can do this a couple different ways: wiggle the bones around and see how loose they feel in the meat and/or stick a fork in a meaty party and twist it, you want the meat to give way without much effort.

4. Once the meat is tender, turn the oven to 350 degrees, and pull the ribs out. You'll want to drain the juices and flip the rack over so they are sitting (in the foil) meat side up.  Keep the foil open, exposing the ribs, and brush with BBQ sauce. You'll want to be fairly liberal here. Use about a third of the sauce.

5. Bake for an additional 25-30 minutes, basting every 10-15 minutes, until the sauce caramelizes.

That's it!  

I served mine with homemade coleslaw, loaded baked potatoes, and warm, french bread.

P.S. That BBQ sauce would be wonderful on chicken (think kebobs), salmon, or in a beef stirfry - just to name a few places that have been bouncing around in my head!

Sunday, June 17, 2012

Ice Cream Cake for Cheaters

I'm not sure where I found this recipe. I know it was years ago and I feel like it was in a magazine - maybe while sitting in a waiting room somewhere? Anyway, it was in my pre-pinterest days... do you remember those? You can make any number of variations and it is so simple, yet so good, that people will think you are very fancy! First I've shared the basic recipe, then I've listed some variations.

Ice Cream Cake for Cheaters


Ingredients
12 ice cream sandwiches (I used cookies and cream flavor)
1 tub whipped chocolate frosting (You could make this from scratch.... you could...)

Seriously, that's it!

Directions
1. Place a layer of four ice cream sandwiches side-by-side on a platter.
2. Over the top, spread a thin layer of frosting (it serves as the glue between layers).
3. Then place another layer of sandwiches, then frosting.
4. When you're done, frost the entire "cake" with frosting (top and sides).
5. Place in the freezer without covering.
6. Let it firm up (about an hour) then cover with foil. Leave it to harden another hour or two then serve and dazzle your guests!

Variations:
- You could use any type of ice cream sandwich: mint chocolate chip, strawberry, plain, or a mix of flavors.
- You can substitute cool whip for frosting or replace the chocolate frosting with any flavor of your choice.
- In between layers you could add chocolate, strawberry, or caramel syrup or crushed cookies, nuts, or candies.
- After you frost, but before you freeze, you could sprinkle on crushed cookies, candies, nuts, or sprinkles to add a decorative flair.

The sky's the limit!

Tuesday, June 5, 2012

Baked Orzo with Fontina and Peas

I found the following recipe on the Cooking Channel's web page. It's a Giada De Laurentiis recipe and, I don't know about you, but I think that people who cook Italian food all day, but remain pencil-thin can't be trusted! :)  It's as though she is immune to carbs!

Well 2012 has been the year of the mushroom as I have craved mushrooms for months straight. I'm adding them to everything, even when recipes don't call for them! In addition, the combination of mushrooms, wine, garlic, and thyme, just sends me over the top, so I was thrilled to find the following recipe.  Also, my husband prefers rice to pasta and orzo is a rice-like pasta so he was thrilled. Ok, he wasn't exactly thrilled, he said something like "Cool."  ... that's how my husband exhibits "thrilled."

The original recipe uses an entire pound of orzo, but I cut it in half. My version is below.

Baked Orzo with Fontina and Peas


Baked Orzo with Fontina and Peas 
INGREDIENTS
2 cups chicken broth
1/2 pound orzo pasta
2 tablespoons butter, plus more to grease the baking dish
1/2 onion, chopped
8 ounces mushrooms, sliced
3/4 cup Marsala wine (I used a red table wine that I had on hand)
1/4 cup heavy cream (I used 2% milk because that's what was in the fridge)
1/2 cup shredded fontina cheese (I used a pre-shredded parm, fontina, asiago mix)
1/2 diced fresh, diced mozzarella (fresh would be wonderful, I used the shreds)
1 cup frozen peas, thawed
1/2 teaspoon salt
1/2 teaspoons freshly ground black pepper
1/2 cup bread crumbs
1/4 cup grated Parmesan (I used the same mix I mentioned above)
1 teaspoon dried thyme

DIRECTIONS
Preheat the oven to 400 degrees F. Grease a casserole dish or 9x9 pan.

Bring the chicken broth to a boil over medium-high heat in a medium saucepan. Add the orzo and cook until almost tender, about 7 minutes. Pour the orzo and the broth into a large bowl. Set aside.

Meanwhile, melt the butter over medium heat in a medium skillet. Add the onions and saute until tender, about 3 minutes. Add the mushrooms and continue to saute until the mushrooms are beginning to turn golden around the edges, about 7 minutes. Add the Marsala. Scrape the brown bits off the bottom of the pan and cook until the Marsala has reduced by half, about 5 minutes. Add the mushroom mixture to the orzo in the large bowl. Add the cream, fontina, mozzarella, peas, salt, and pepper. Stir to combine. Pour the mixture into the prepared baking dish.

In a small bowl combine the bread crumbs, Parmesan, and dried thyme. Sprinkle the bread crumb mixture on top of the pasta. Bake until golden, about 25 minutes.

Nutrition: 
The original recipe (with heavy cream and fresh mozz) is 350 calories per 1 cup serving. I imagine the substitutions lighten it up a bit, but My Fitness Pal was giving me problems tonight so I'll have to update this later.

Overall...
I thought this was good, but I'd make some changes in the future. First of all, I'd add several cloves of garlic to the onion and mushroom mix because I love, love, love garlic. I also thought it would be delicious to first saute a few strips of bacon, set it aside and cook the onions/garlic/mushroom mixture in the bacon grease and THEN add the chopped bacon to the mix.  It was a great side dish, however, to a protein with a strong flavor.  For example, I served this with spicy and salty tortilla-crusted tilapia (a store in my town sells these and they are amazing!). The orzo mix is a nice, mellow pairing with something like this fish.

It would also be good with additional veggies: broccoli, asparagus, and water chestnuts would be good (in any combination). Or you could toss some diced chicken into the mix as well.  Because of it's versatility, this dish is definitely a keeper.

Thursday, May 31, 2012

Grilled Chipotle Pork Tenderloin with Beans and Rice

I'm not sure there is an easier cut of meat to prepare than pork tenderloin.  Pork tenderloins are generally inexpensive (and often on sale) and the perfect size for a family of four.  They absorb the flavors of marinades and rubs as easily as a chicken breast and, aside from gross over-cooking, you're sure to get a flavorful, juicy result whether you cook it in the oven or on the grill.  I personally think the grill is the way to go, however. Another great thing about pork tenderloins is that they don't take as long to cook as a pork roast or whole chicken and they are low in fat!  In fact 5 ounces is only around 175 calories.

This meal was really a mix of necessity and craving. First, I had thrown the tenderloin in the fridge to defrost Tuesday night, therefore, it needed to be eaten. However, I found myself daydreaming at work and surfing through patiodaddiobbq.com (yes, this is the life I live) and I found his Funky Refried Beans. They intruiged me, but I had this darn tenderloin to cook. So I decided to do some kind of tex-mex take on the pork and pair it with refried beans and spanish rice.  If chipotle isn't your thing, garlic butter, cilantro lime, and plain old BBQ sauce are all delicious on grilled pork tenderloins.  Heck any viniagarette dressing would work as well.  I tend to stay away from the pre-seasoned tenderloins because they are insanely high in sodium. The longer you marinade the better, but I tend to do it last minute and things still work out just fine.

Pork Tenderloin with Mexican Chipotle Marinade 
from Food and Wine.com
  photo credit

Ingredients
6 canned chipotle chiles in adobo, plus 2 tablespoons of sauce from the can (find in the ethnic food aisle)
5 garlic cloves, thinly sliced
One 3-inch strip of orange zest
3/4 cup fresh orange juice
1/4 cup fresh lime juice
2 tablespoons red wine vinegar
1 tablespoon tomato paste
1 teaspoon dried oregano
1 teaspoon ground cumin
1/2 teaspoon freshly ground pepper
1 1/2 pounds pork tenderloin

Directions
1.  In a small saucepan, combine the chipotles and their sauce with the garlic, orange zest, orange juice, lime juice, red wine vinegar, tomato paste, oregano, cumin and pepper. Simmer over high heat until reduced by one-third, about 3 minutes. Transfer the contents of the pan to a food processor and puree until smooth. Let cool before using.

2.  Coat the pork with 1/2 of the marinade and refrigerate for 2 hours (**I marinated for about 30 minutes).

3. Light the grill. Grill the pork over a hot fire, turning, until cooked through, about 15 minutes. Baste with remaining marinade through cooking process. Let stand for 3 minutes before slicing and serving. (*Mine took a little longer, you're looking for an internal temp of about 165).

*It's also to eat pork a little pink now so don't worry about cooking it to leather!

Funky Refried Beans from Patio Daddio BBQ.com
My husband loves ranch-style beans (which can be tricky to find, depending on the store). When I saw that this recipe incorporated them, I knew I must try it! I made a few minor changes. My version is below.
Funky Refried Beans
Ingredients
1 can (15 oz) Original Ranch Style Beans, undrained
1 can (10 oz) Rotel Tomato & Green Chilies, drained
1/2 Medium onion, diced
1-2 garlic cloves, minced
1 Tbsp oil (I used EVOO)

Directions
1. Heat oil in a small saucepan. Add the onion and garlic and saute until softened.
2. Add the beans and rotel and heat through.
3. You could serve the mixture with whole beans. I mashed mine.  I generally use a bean or potato masher and do it by hand, but tonight I had the inversion blender out already so I just ran that through the mixture. If you do this, you'll get a little bit of a runnier mixture than if you mash by hand.

These were good and spicy! Top with cheese and/or sour cream if you're so inclined.


Spanish Rice 
I'm quite proud of my Spanish rice and it has taken me years to craft it to family's liking.  I have a few tricks that I've developed over the years, but (mostly so I can torture my brother-in-law) I have not included all of them here ;)  This recipe will yield a rice that is light in flavor - not one of those heavy-on-the-tomato varieties that you'll find in packets and at bad restaurants.  THIS is a staple in my home:
Ingredients
2 cups chicken broth (or vegetable broth or water)
1/2 teaspoons salt
2 Tbsps cup extra-virgin olive oil
1 cup medium- or long-grain white rice
1 Tbsp tomato sauce
1/2 medium onion, chopped or sliced - optional
1/2 green pepper chopped or sliced - optional
1-2 garlic cloves, minced - optional
1 tomato coarsely chopped - optional

Directions
1.  In deep saucepan, heat olive oil and stir in rice (straight from the package--do not rinse). Cook over medium heat, stirring occasionally, until rice is lightly browned. This may take 10 to 20 minutes. Throw in the garlic, onion, and green pepper about 5 minutes in to the browning process.

2 Gradually stir tomato sauce into rice and cook for a minute or two, then add tomatoes, broth and salt to rice. Stir only once to incorporate then crank the heat and bring it to a boil. Once boiling, put the lid on tightly, reduce heat to the very lowest setting and leave undisturbed for the length of time specified on your rice bag, usually about 20 minutes. Do not remove the lid during the cooking time! Do not stir, do not peak, do not open until Christmas!

3 When the 20 minutes are up, peak to see if the liquid is completely evaporated. If not, simmer a few more minutes, if so, remove from heat, replace the lid, and let the rice stand for about 10 minutes. Then fluff with a fork and enjoy!

Tuesday, May 22, 2012

Restaurant-Style Ranch Dressing - LOW CAL!

I'm am a complete trend-follower when it comes to ranch dressing. I absolutely love it. I think that just about every food (certainly every bread product) is enhanced by a quick dip in ranch dressing.  On salads, I do love vinaigrettes, but nothing can compare to my love of ranch.  I don't eat it on salads much at home, however, because I don't really like the bottled stuff. It's too thick, usually too salty, sometimes the dill is too strong - it's nothing like the creamy, smooth stuff you get at a restaurant.  I've tried to make it at home and the result always tasted like the bottled stuff.  That is, until I found this recipe on pinterest.

I was hesitant because my experience with plain Greek yogurt is that the end result tastes like, well, plain Greek yogurt.  I didn't think this would possibly work, but it did! This recipe creates a thin, savory ranch dressing that's just like the restaurants serve!  I might use a little less milk in the future (or a little more yogurt) because it is quite runny, but flavor-wise, it's a 10!  I even had one of my ranch-crazy co-workers sample it and she agreed!

Best of all? The entire recipe is 255 calories. That's about 10 calories per tablespoon! Where are you going to find numbers like that on the salad dressing aisle?

Restaurant-Style Ranch Dressing
The recipe comes from The Caffeinated Chronicles of Motherhood (great title!)

Ingredients
1 cup plain, nonfat Greek yogurt
1 packet Hidden Valley Ranch dressing mix
1/2 cup lowfat milk (the calculations are for 1%)

Directions:
Combine, stir, refrigerate!  

I ate mine right away, but the website suggested letting it meld for an hour in the fridge. The comments section of the original blog suggested stirring a little cottage cheese in as well.  I'm a purist, however.  This is so spot-on I will probably make a habit of keeping ranch dressing packets in my cupboard! Or better yet, I'll make my own!

Monday, May 21, 2012

20 Minute Stove Top Mac and Cheese

Once you make this recipe you will seriously never go back to boxed mac and cheese again! Although, I'm not going to lie, I have a soft spot in my heart for Kraft Mac and Cheese.  That was one of the first things I could "cook" on my own (although my specialty was omelets).  I also made countless boxes during my extremely successful babysitting career (the high school years). I don't want to feed it to my son for a few reasons (1) it's high in sodium, (2) as a cheese-lover, cheese in powdered form causes me physical pain, (3) I'd like to develop his palette to appreciate good food, and (4) Kraft uses artificial food dyes and the FDA has said, "artificial food dye is an issue for certain susceptible children with ADHD [attention deficit hyperactivity disorder] and other problem behaviors." That's just a start. In fact in 2007 a study linked the use of these dyes to hyperactivity in children.  It might not hurt my child at all, but why risk it? It is possible to smoke for an entire lifetime and never develop cancer, but why risk it?  Anyway, homemade is always better and certainly more nutritious (in my humble opinion).  The problem is that homemade usually takes longer.  

Enter 

Stove Top Mac and Cheese courtesy of Cooking Light magazine.
Stovetop Mac and Cheese Recipe

Ingredients

  • 1 1/4 cups uncooked elbow macaroni (about 6 ounces)
  • 1 cup 1% low-fat milk
  • 2 tablespoons all-purpose flour
  • 1 1/4 cups shredded reduced-fat sharp cheddar cheese (I used sharp Pinconning because it's local and because it melts very smoothly).
  • 1/2 teaspoon salt
  • 1/8 teaspoon freshly ground black pepper
  • 1 (1 1/2-ounce) slice white bread 
  • 1 tablespoon butter, melted
Preparation
Cook pasta according to package directions. Drain.
Combine milk and flour in a medium saucepan, stirring with a whisk. Cook over medium heat 2 minutes or until thick, stirring constantly with a whisk. Add cheese, salt, and pepper, (I also added a little garlic powder) stirring with a whisk until smooth. 
Add pasta; toss to coat. Let stand 4 minutes.
*I omitted the breadcrumb part:
Place bread in a food processor, and pulse 10 times or until the crumbs measure 1 1/4 cups. 
Heat a large nonstick skillet over medium heat. Add breadcrumbs, and cook 5 minutes or until lightly browned, stirring occasionally. Stir in melted butter; cook 2 minutes, stirring occasionally. Sprinkle breadcrumb mixture over pasta mixture.
The Review?
This literally took 20 minutes to make.  It was absolutely no more work than a box of Kraft or Velveeta takes to make and much more delicious. You could stir in broccoli, spinach, ham, bacon, peas, carrots - anything you so desire! I just made a second batch tonight with the intention of freezing it so that I can defrost at a moment's notice.